Label Studio와 MMDetection으로 객체 감지 AI 훈련하기
레이블링 및 훈련에는 일정한 접착이 필요하다.
언제 제가 object detector AI 훈련 했을 때, LabelImg는 매우 유용한 도구였지만, Label Studio에서 COCO 형식으로 내보내는 것이 MMDetection 프레임워크에 의해 수용되지 않았습니다.
그것을 작동시키기 위해서는 몇 가지 도구와 스크립팅이 필요했습니다.

여기서 누락된 부분과 몇 가지 스크립트를 나열합니다. 그 중 일부는 인터넷에서 찾았고, 나머지는 제가 직접 작성했습니다.
기본 단계
AI를 준비, 훈련하고 사용하는 것은 다음과 같은 단계를 포함합니다.
- 원본 데이터 확보 (객체 감지 및 분류를 위한 이미지)
- 이미지 라벨링 및 데이터셋 준비
- 새로운 모델 개발 또는 적절한 기존 모델 찾기
- 모델 훈련, 때로는 하이퍼 파라미터 조정
- 모델을 사용하여 새로운 이미지에 대한 라벨 예측 (인퍼런스)
여기서 저는 Label Studio를 사용하여 데이터를 라벨링하는 방법 (단계 2)과 mmdetection 및 torchvision으로 훈련하는 방법 (단계 4), 그리고 인퍼런스 (단계 5)에 대해 구체적인 단계를 제공합니다.
Label Studio
이것은 LabelImg 프로그램의 오픈소스 루트를 가지고 있지만, 이제 매우 중앙 집중적으로 개발되고 유지보수가 이루어지고 있습니다. 물론 기업용 버전도 있습니다.
그럼에도 불구하고, 자체 호스팅이 가능하며, 이는 매우 편리합니다.
구성 및 실행
Label Studio를 여러 가지 방법으로 설치 및 실행할 수 있습니다. 예를 들어 pip 패키지나 docker compose 컨테이너 그룹을 사용할 수 있습니다. 여기서는 단일 docker 컨테이너를 사용합니다.
소스 폴더 준비
mkdir ~/ls-data
sudo chown -R 1001:1001 ~/ls-data10
로컬 스토리지 구성
mkdir ~/ai-local-store
mkdir ~/ai-local-labels

# 몇 가지 추가 권한 설정
~/ai-local-store에는 이미지 파일을 보관하고, ~/ai-local-labels에는 동기화된 라벨을 보관합니다.
도커 컨테이너 시작
docker run -it -p 8080:8080 \
    -e LABEL_STUDIO_HOST=http://your_ip_address:8080/ \
    -e LABEL_STUDIO_LOCAL_FILES_SERVING_ENABLED=true \
    -e LABEL_STUDIO_LOCAL_FILES_DOCUMENT_ROOT=/ai-local-store \
    -e DATA_UPLOAD_MAX_NUMBER_FILES=10000000 \
    -v /home/somename/ls-data:/label-studio/data \
    -v /home/somename/ai-local-store:/ai-local-store \
    -v /home/somename/ai-local-labels:/ai-local-labels \
    heartexlabs/label-studio:latest \
    label-studio \
    --log-level DEBUG
LABEL_STUDIO_HOST - LS 웹 UI 리디렉션 때문입니다. DATA_UPLOAD_MAX_NUMBER_FILES … Django는 파일 업로드 수를 100으로 제한했고, 이는 Label Studio에 매우 나쁜 영향을 미쳤기 때문에 이 새로운 제한을 제공해야 했습니다. 모든 다른 설정은 Label Studio 문서에 잘 설명되어 있습니다.
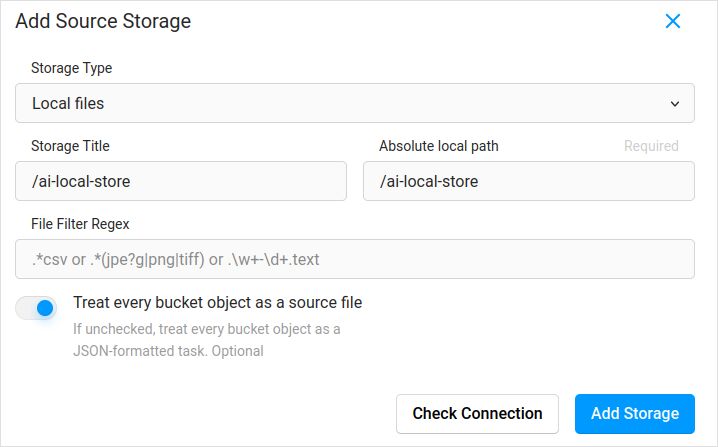
구성 파일을 가져옵니다. 프로젝트 설정에서 클라우드 스토리지에 Local Files 유형의 소스 스토리지 추가 예시와 유사하게:

이미지 동기화를 계획하고 있다면 (제가 생각하기에 그렇습니다), “각 버킷 객체를 소스 파일로 간주” 체크박스를 꼭 체크하세요. 이미지에 대한 라벨이 별도의 json 파일에 있다면, 이 클라우드 스토리지를 구성하면 됩니다. 동기화를 클릭하지 마세요. 그리고 json 파일을 가져옵니다.
목적지 클라우드 스토리지와 ai-local-labels를 동기화하려면 동일하게 구성하세요.
Label Studio에 사전 라벨링된 데이터 가져오기
COCO json 형식을 매우 좋아합니다. Pascal VOC도 그렇습니다. 하지만 이들은 Label Studio와 직접 호환되지 않기 때문에, 먼저 LS 전용 형식으로 변환해야 합니다.
하지만 그 전에, 데이터셋 필터링이 필요할 수 있습니다. 모든 라벨이 필요하지 않을 수 있습니다. 저는 coco-manager의 filter.py 스크립트를 좋아합니다: https://github.com/immersive-limit/coco-manager/blob/master/filter.py
python filter.py --input_json instances_train2017.json --output_json filtered.json --categories person dog cat
좋습니다, 이제 변환기를 설치하세요. 공식 사이트에서 권장하는 방법으로:
python -m venv env
source env/bin/activate
git clone https://github.com/heartexlabs/label-studio-converter.git
cd label-studio-converter
pip install -e .
COCO에서 변환하고 올바른 폴더 설정
label-studio-converter import coco -i your-input-file.json -o output.json
Label Studio에서 Import 버튼을 클릭하여 output.json을 가져옵니다.
라벨링
여기서 매우 창의적인 작업이 많이 이루어집니다.
내보내기
Label Studio에서 Export 버튼을 클릭하고 COCO 형식을 선택한 후, 이 파일 안을 살펴보세요. 이미지 이름이 다음과 같을 것입니다. 이전에 이미지 기본 경로를 덮어쓰지 않고 라벨을 가져온 경우
  "images": [
    {
      "width": 800,
      "height": 600,
      "id": 0,
      "file_name": "\/data\/local-files\/?d=\/iteration1001\/123.jpg"
    },
혹은 외부 클라우드 스토리지를 동기화한 경우 다음과 같을 것입니다.
  "images": [
    {
      "width": 800,
      "height": 600,
      "id": 0,
      "file_name": "http:\/\/localhost:8080\/data\/local-files\/?d=iteration1001\/123.jpg"
    },
이것들은 매우 보기 좋지 않습니다. 다음과 같은 형태가 필요합니다.
  "images": [
    {
      "width": 800,
      "height": 600,
      "id": 0,
      "file_name": "iteration1001/123.jpg"
    },
이름을 수정하기 위해 저는 멋진 스크립트를 사용했습니다. 이 스크립트는 result.json 파일을 덮어쓰기 때문에, 사전에 백업이 필요하다면 스스로 신경 써야 합니다:
sed -i -e 's/\\\/data\\\/local-files\\\/?d=\\\///g' ~/tmp/result.json
sed -i "s%http:\\\/\\\/localhost:8080\\\/data\\\/local-files\\\/?d=%%" ~/tmp/result.json
sed -i "s%http:\\\/\\\/your_ip_address:8080\\\/data\\\/local-files\\\/?d=%%" ~/tmp/result.json
Label Studio 데이터 및 데이터베이스 백업
Label Studio 도커 컨테이너를 신중하게 중지한 후, 다음과 같은 명령어를 실행하세요:
cp ~/ls-data ~/all-my-backups
cp ~/ai-local-store ~/all-my-backups
cp ~/ai-local-labels ~/all-my-backups
병합
종종 여러 데이터셋을 하나로 병합해야 할 때가 있습니다, 특히 여러 번의 반복을 실행할 때.
저는 COCO-merger 도구를 사용했습니다. 설치 후 -h 파라미터로 실행하면:
python tools/COCO_merger/merge.py -h

COCO Files Merge Usage

python -m COCO_merger.merge --src Json1.json Json2.json --out OUTPUT_JSON.json

Argument parser

usage: merge.py [-h] --src SRC SRC --out OUT

Merge two annotation files to one file

optional arguments:
  -h, --help     show this help message and exit
  --src SRC SRC  Path of two annotation files to merge
  --out OUT      Path of the output annotation file
네, 두 파일만 병합할 수 있습니다. 10번의 반복이 있다면 추가적인 노력이 필요합니다. 그래도 좋아합니다.
MMDetection

데이터셋 분할
데이터셋을 훈련 및 테스트로 분할하기 위해 COCOSplit 도구를 사용했습니다.
git clone https://github.com/akarazniewicz/cocosplit.git
cd cocosplit
pip install -r requirements
이것은 그렇게 복잡하지 않습니다:
$ python cocosplit.py -h
usage: cocosplit.py [-h] -s SPLIT [--having-annotations]
                    coco_annotations train test

Splits COCO annotations file into training and test sets.

positional arguments:
  coco_annotations      Path to COCO annotations file.
  train                 Where to store COCO training annotations
  test                  Where to store COCO test annotations

optional arguments:
  -h, --help            show this help message and exit
  -s SPLIT              A percentage of a split; a number in (0, 1)
  --having-annotations  Ignore all images without annotations. Keep only these
                        with at least one annotation
  --multi-class         Split a multi-class dataset while preserving class
                        distributions in train and test sets
COCO 분할을 실행하려면:
python cocosplit.py --having-annotations \
  --multi-class \
  -s 0.8 \
  source_coco_annotations.json \
  train.json \
  test.json
이 분할 도구는 데이터셋 json의 시작 부분에 “licenses” 속성을 추가해야 한다는 것을 정말 원합니다.
"licenses": [],
구성
네, 모델 구성은 복잡합니다.
하지만 mask-rcnn은 매우 빠르고 합리적인 감지율을 가지고 있습니다. 구성 세부 사항은 여기에서 확인하세요: https://mmdetection.readthedocs.io/en/latest/user_guides/train.html#train-with-customized-datasets
# 새로운 구성은 기존 구성에서 상속하여 필요한 수정사항을 강조합니다
_base_ = '/home/someusername/mmdetection/configs/mask_rcnn/mask-rcnn_r50-caffe_fpn_ms-poly-1x_coco.py'

# 데이터셋의 애노테이션과 일치하도록 head의 num_classes를 변경해야 합니다
model = dict(
    roi_head=dict(
        bbox_head=dict(num_classes=3),
        mask_head=dict(num_classes=3)))

# 데이터셋 관련 설정 변경
data_root = '/home/someusername/'
metainfo = {
    'classes': ('MyClass1', 'AnotherClass2', 'AndTheLastOne3'),
    'palette': [
        (220, 20, 60),
        (20, 60, 220),
        (60, 220, 20),
    ]
}
train_dataloader = dict(
    batch_size=1,
    dataset=dict(
        data_root=data_root,
        metainfo=metainfo,
        ann_file='train.json',
        data_prefix=dict(img='')))
val_dataloader = dict(
    dataset=dict(
        data_root=data_root,
        metainfo=metainfo,
        ann_file='test.json',
        data_prefix=dict(img='')))
test_dataloader = val_dataloader

# 메트릭 관련 설정 변경
val_evaluator = dict(ann_file=data_root+'test.json')
test_evaluator = val_evaluator

# 더 높은 성능을 위해 사전 훈련된 Mask RCNN 모델을 사용할 수 있습니다
load_from = 'https://download.openmmlab.com/mmdetection/v2.0/mask_rcnn/mask_rcnn_r50_caffe_fpn_mstrain-poly_3x_coco/mask_rcnn_r50_caffe_fpn_mstrain-poly_3x_coco_bbox_mAP-0.408__segm_mAP-0.37_20200504_163245-42aa3d00.pth'

# 긴 영상이 좋아진다면
# 기본값은 12입니다
train_cfg = dict(max_epochs=24)
마스크가 필요하지 않다면 참고할 만한 내용: https://mmdetection.readthedocs.io/en/latest/user_guides/single_stage_as_rpn.html
훈련
모델 구성이 /home/someusername/myproject/models/configs/mask-rcnn_r50-caffe_fpn_ms-poly-1x_v1.0.py에 있다고 가정합니다. 훈련 스크립트는 mmdetection 도구의 표준 호출입니다:
cd ~/mmdetection
python tools/train.py \
    /home/someusername/myproject/models/configs/mask-rcnn_r50-caffe_fpn_ms-poly-1x_v1.0.py \
    --work-dir /home/someusername/myproject/work-dirs/my-object-detector-v1.0-mask-rcnn_r50-caffe_fpn_ms-poly-1x
인퍼런스
일부 문서는 여기에 있습니다: https://mmdetection.readthedocs.io/en/latest/user_guides/inference.html
from mmdet.apis import DetInferencer

inferencer = DetInferencer(
    model='/home/someusername/myproject/models/configs/mask-rcnn_r50-caffe_fpn_ms-poly-1x_v1.0.py',
    weights='/home/someusername/myproject/work-dirs/my-object-detector-v1.0-mask-rcnn_r50-caffe_fpn_ms-poly-1x/epoch_12.pth')

# 단일 파일에 대해 실행:
# inferencer('demo/demo.jpg', out_dir='/home/someusername/myproject/test-output/1.0/', show=True)

# 전체 폴더에 대해 실행
inferencer('/home/someusername/myproject/test-images/', out_dir='/home/someusername/myproject/test-output/1.0/', no_save_pred=False)
유용한 링크
이 글이 당신에게 도움이 되기를 바랍니다.
다른 유용한 자료는 다음을 참조하세요.

