Training Object Detector AI with Label Studio & MMDetection
Labelling and training needs some glueing
When I trained object detector AI some time ago - LabelImg was a very helpful tool, but the export from Label Studio to COCO format wasn’t accepted by MMDetection framework..
It needed some tooling and scripting to make it all work.

Listing here missing bits and some scripts some of which I found on the internet and written myself the others.
Basic steps
Preparing, training and using AI involves
- obtaining source data (images for object detection and classification)
- labelling images and preparing dataset
- developing new model or finding suitable existing
- training model, sometimes with hyper parameter tuning
- using model to predict labels for new images (ingerring)
Here I’m giving exact steps how to label data with Label Studio (step 2) and train with mmdetection and torchvision (step 4), and touching inference (step 5)
Label Studio
It has some open source roots in LabelImg program but now developed and maintained in a very centralised way. And has an enterprise version of course.
Still it’s available for self-hosting, which is very nice.
Configure and run
Can install and run Label Studio in several ways, like pip package for example, or docker compose container group. Here I’m using single docker container.
Prepare source folder
mkdir ~/ls-data
sudo chown -R 1001:1001 ~/ls-data10
Local storge config
mkdir ~/ai-local-store
mkdir ~/ai-local-labels

# set up some extra permissions
In ~/ai-local-store you keep the image files, ~/ai-local-labels - outsynched labels.
Start docker container
docker run -it -p 8080:8080 \
    -e LABEL_STUDIO_HOST=http://your_ip_address:8080/ \
    -e LABEL_STUDIO_LOCAL_FILES_SERVING_ENABLED=true \
    -e LABEL_STUDIO_LOCAL_FILES_DOCUMENT_ROOT=/ai-local-store \
    -e DATA_UPLOAD_MAX_NUMBER_FILES=10000000 \
    -v /home/somename/ls-data:/label-studio/data \
    -v /home/somename/ai-local-store:/ai-local-store \
    -v /home/somename/ai-local-labels:/ai-local-labels \
    heartexlabs/label-studio:latest \
    label-studio \
    --log-level DEBUG
LABEL_STUDIO_HOST - because of LS webui redirects. DATA_UPLOAD_MAX_NUMBER_FILES … Django restricted upload filecount to 100 and it had terrible effect on label studio, so needed to provide this new limit. All other configs are very well documented in the Label Studio docs.
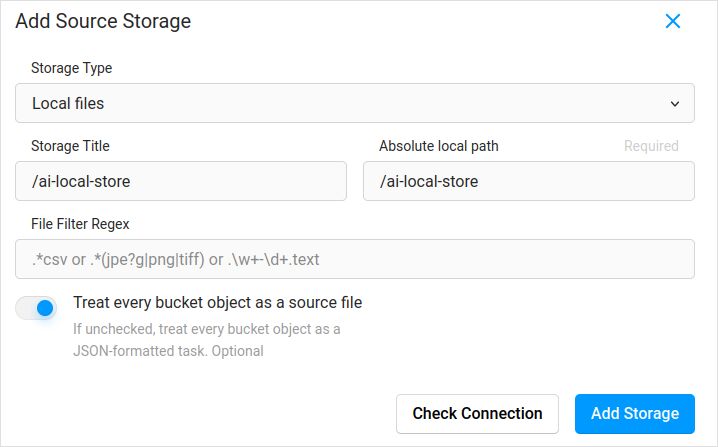
Import config. In project settings in Cloud Storage add Source Storage of Local Files type similar to:

Don’t forget to tick “Treat every bucket object as a source file” if you planning to sync in images (I believe yes you are), not the jsons. If you already have some labels for these images in separate json - you just configure this Cloud Storage. Not clicking Sync. And then Importing the json.
Configure the same for the Target Cloud Storage and ai-local-labels - if you want to sync them out.
Import prelabelled data into Label Studio
Love COCO json format. An Pascal VOC too. But they are not directly compatible with Label Studio so need to convert into LS proprietary format first.
But before - probably will need to filter the dataset. You might need only some labels there, not all. I like filter.py script from coco-manager: https://github.com/immersive-limit/coco-manager/blob/master/filter.py
python filter.py --input_json instances_train2017.json --output_json filtered.json --categories person dog cat
Ok, now, install the convertor. Like the converter official site recomments:
python -m venv env
source env/bin/activate
git clone https://github.com/heartexlabs/label-studio-converter.git
cd label-studio-converter
pip install -e .
Convert from coco and setting correct folder
label-studio-converter import coco -i your-input-file.json -o output.json
Import the output.json by clicking in Label Studio the Import button.
Labelling
A lot of extremely creative work is done here.
Export
After clicking Export button in Label Studio and selecting the COC export format - have a look inside this file and admire the image names. They would look like this if you imported labels beforehand not overriding the image base path
  "images": [
    {
      "width": 800,
      "height": 600,
      "id": 0,
      "file_name": "\/data\/local-files\/?d=\/iteration1001\/123.jpg"
    },
Or would look like this if you synched external Cloud Storage.
  "images": [
    {
      "width": 800,
      "height": 600,
      "id": 0,
      "file_name": "http:\/\/localhost:8080\/data\/local-files\/?d=iteration1001\/123.jpg"
    },
Thise are not very nice. we want something like
  "images": [
    {
      "width": 800,
      "height": 600,
      "id": 0,
      "file_name": "iteration1001/123.jpg"
    },
To fix the filenames I used lovely scripts. They are overwriting the result.json file, so if you need a backup beforehand - take care of it yourselves:
sed -i -e 's/\\\/data\\\/local-files\\\/?d=\\\///g' ~/tmp/result.json
sed -i "s%http:\\\/\\\/localhost:8080\\\/data\\\/local-files\\\/?d=%%" ~/tmp/result.json
sed -i "s%http:\\\/\\\/your_ip_address:8080\\\/data\\\/local-files\\\/?d=%%" ~/tmp/result.json
Backup Label Studio data and db
Carefully stop your Label Studio docker container and then run something like
cp ~/ls-data ~/all-my-backups
cp ~/ai-local-store ~/all-my-backups
cp ~/ai-local-labels ~/all-my-backups
Merge
Sometimes need to merge several datasets into one, especially id running several iterations.
I used COCO-merger tool. After installing and running with -h param:
python tools/COCO_merger/merge.py -h

COCO Files Merge Usage

python -m COCO_merger.merge --src Json1.json Json2.json --out OUTPUT_JSON.json

Argument parser

usage: merge.py [-h] --src SRC SRC --out OUT

Merge two annotation files to one file

optional arguments:
  -h, --help     show this help message and exit
  --src SRC SRC  Path of two annotation files to merge
  --out OUT      Path of the output annotation file
Yes. can merge only two files. So if you have 10 iterations - need to make extra effort. Still like it.
MMDetection

Splitting the dataset
To split dataset to training and test I used COCOSplit tool.
git clone https://github.com/akarazniewicz/cocosplit.git
cd cocosplit
pip install -r requirements
There is not too much to it:
$ python cocosplit.py -h
usage: cocosplit.py [-h] -s SPLIT [--having-annotations]
                    coco_annotations train test

Splits COCO annotations file into training and test sets.

positional arguments:
  coco_annotations      Path to COCO annotations file.
  train                 Where to store COCO training annotations
  test                  Where to store COCO test annotations

optional arguments:
  -h, --help            show this help message and exit
  -s SPLIT              A percentage of a split; a number in (0, 1)
  --having-annotations  Ignore all images without annotations. Keep only these
                        with at least one annotation
  --multi-class         Split a multi-class dataset while preserving class
                        distributions in train and test sets
To run the coco split:
python cocosplit.py --having-annotations \
  --multi-class \
  -s 0.8 \
  source_coco_annotations.json \
  train.json \
  test.json
Just remember to add the licenses prop into beginning of the dataset json, somewhere after first “{”. This spliting tool really wants it.
"licenses": [],
Configuration
Yes, model configs are tricky.
But mask-rcnn is quite fast and has reasonable detection rate. See here for the config details: https://mmdetection.readthedocs.io/en/latest/user_guides/train.html#train-with-customized-datasets
# The new config inherits a base config to highlight the necessary modification
_base_ = '/home/someusername/mmdetection/configs/mask_rcnn/mask-rcnn_r50-caffe_fpn_ms-poly-1x_coco.py'

# We also need to change the num_classes in head to match the dataset's annotation
model = dict(
    roi_head=dict(
        bbox_head=dict(num_classes=3),
        mask_head=dict(num_classes=3)))

# Modify dataset related settings
data_root = '/home/someusername/'
metainfo = {
    'classes': ('MyClass1', 'AnotherClass2', 'AndTheLastOne3'),
    'palette': [
        (220, 20, 60),
        (20, 60, 220),
        (60, 220, 20),
    ]
}
train_dataloader = dict(
    batch_size=1,
    dataset=dict(
        data_root=data_root,
        metainfo=metainfo,
        ann_file='train.json',
        data_prefix=dict(img='')))
val_dataloader = dict(
    dataset=dict(
        data_root=data_root,
        metainfo=metainfo,
        ann_file='test.json',
        data_prefix=dict(img='')))
test_dataloader = val_dataloader

# Modify metric related settings
val_evaluator = dict(ann_file=data_root+'test.json')
test_evaluator = val_evaluator

# We can use the pre-trained Mask RCNN model to obtain higher performance
load_from = 'https://download.openmmlab.com/mmdetection/v2.0/mask_rcnn/mask_rcnn_r50_caffe_fpn_mstrain-poly_3x_coco/mask_rcnn_r50_caffe_fpn_mstrain-poly_3x_coco_bbox_mAP-0.408__segm_mAP-0.37_20200504_163245-42aa3d00.pth'

# if you like the long movies
# the default here if I remember correctly is 12
train_cfg = dict(max_epochs=24)
Something to look at if the masks are not needed: https://mmdetection.readthedocs.io/en/latest/user_guides/single_stage_as_rpn.html
Training
let’s assume you have your model config in /home/someusername/myproject/models/configs/mask-rcnn_r50-caffe_fpn_ms-poly-1x_v1.0.py . The training script is standard call to mmdetection tool:
cd ~/mmdetection
python tools/train.py \
    /home/someusername/myproject/models/configs/mask-rcnn_r50-caffe_fpn_ms-poly-1x_v1.0.py \
    --work-dir /home/someusername/myproject/work-dirs/my-object-detector-v1.0-mask-rcnn_r50-caffe_fpn_ms-poly-1x
Inference
Some docs are here: https://mmdetection.readthedocs.io/en/latest/user_guides/inference.html
from mmdet.apis import DetInferencer

inferencer = DetInferencer(
    model='/home/someusername/myproject/models/configs/mask-rcnn_r50-caffe_fpn_ms-poly-1x_v1.0.py',
    weights='/home/someusername/myproject/work-dirs/my-object-detector-v1.0-mask-rcnn_r50-caffe_fpn_ms-poly-1x/epoch_12.pth')

# run it for single file:
# inferencer('demo/demo.jpg', out_dir='/home/someusername/myproject/test-output/1.0/', show=True)

# or for the whole folder
inferencer('/home/someusername/myproject/test-images/', out_dir='/home/someusername/myproject/test-output/1.0/', no_save_pred=False)
Useful links
Hopefully this helps you in some way.
Other useful read please see on
- Label Studio site: https://labelstud.io/
- MMDetection docs: https://mmdetection.readthedocs.io/en/latest/get_started.html
- Bash Cheat Sheet
- Detecting Concrete Reo Bar Caps with tensorflow
- Python Cheatsheet
- Conda Cheatsheet
- Flux text to image
- Ollama cheatsheet
- Docker Cheatsheet
- Layered Lambdas with AWS SAM and Python
- Generating PDF in Python - Libraries and examples"

