Configure VirtualBox Shared Folders for Linux Guest OS
Step by step instruction for VirtualBox shared folders set up
To configure VirtualBox shared folders in Linux Guest OS, follow these steps:

1. Install VirtualBox Guest Additions
Guest Additions must be installed in the guest OS to enable shared folder support:
- Start the guest.
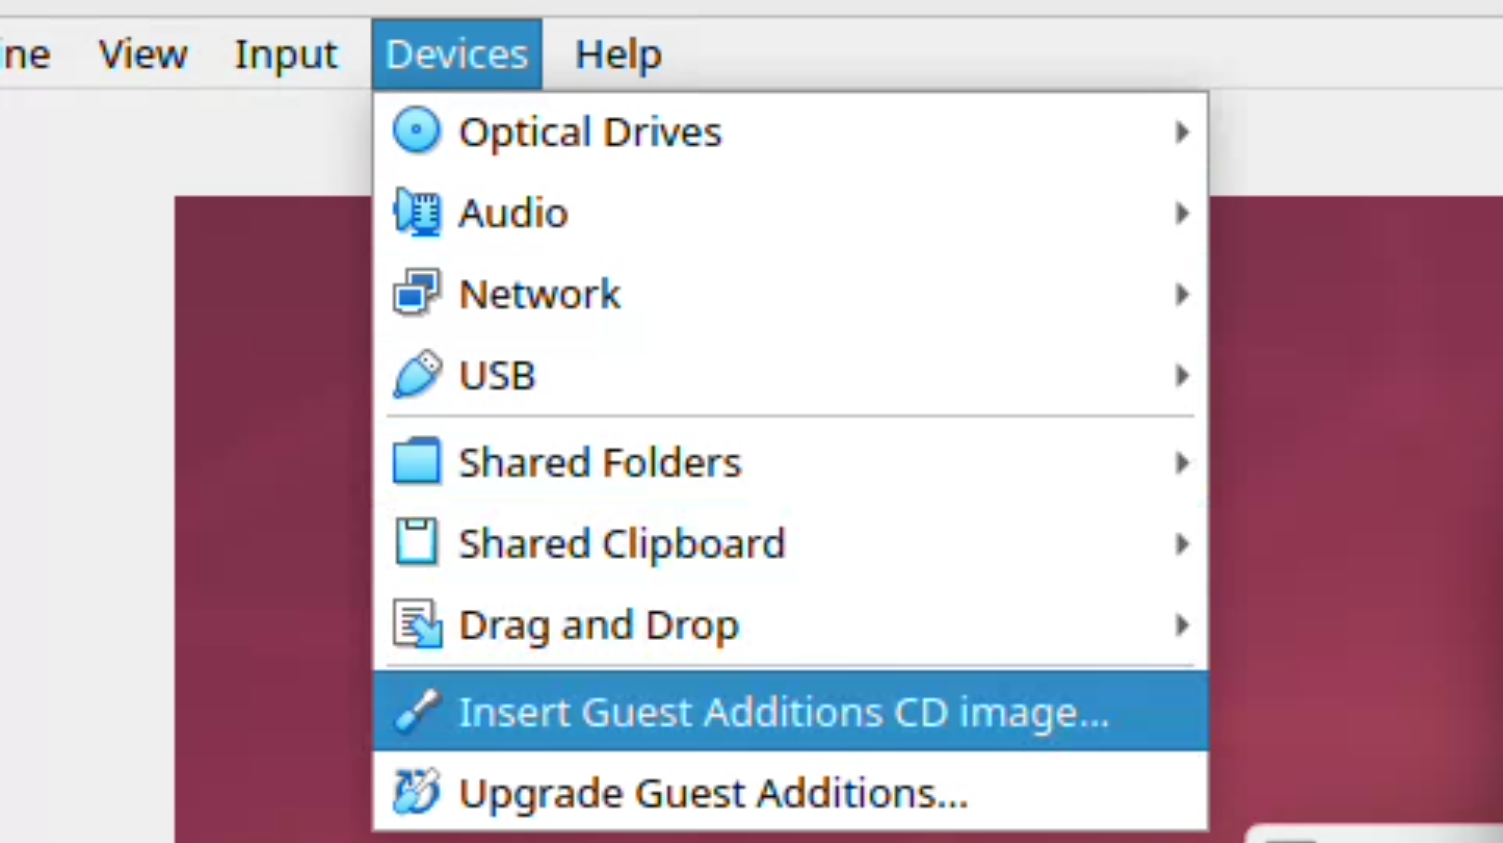
- In VirtualBox menu, select:
Devices > Insert Guest Additions CD Image

- Open a terminal in the guest, mount the CD if necessary, and run the installer:
sudo sh /media/$USER/VBox_GAs_*/VBoxLinuxAdditions.run
-
Reboot the guest after installation.
-
Add your user to the
vboxsfgroup in the guest (this is crucial for access permissions):
sudo usermod -aG vboxsf $(whoami)
` Reboot or log out/in for group changes to take effect.
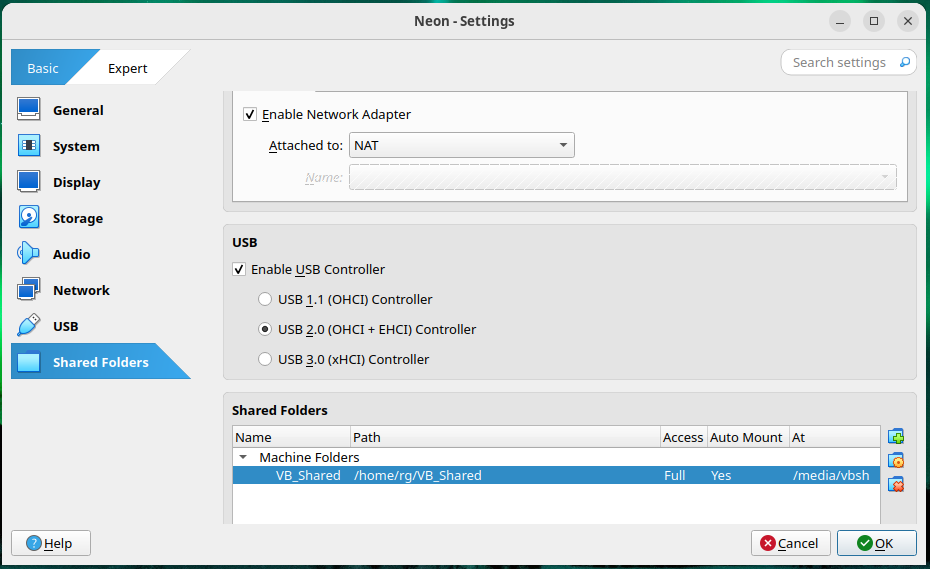
2. Configure Shared Folder in VirtualBox Manager on the Host
- Right-click your VM and go to:
Settings > Shared Folders
- Click the Add Shared Folder button.
- Set the following:
- Folder Path: The folder on your Linux host to be shared.
- Folder Name: The name to reference in the guest (e.g.,
share). - Optionally check Auto-mount so it mounts automatically at boot.
- Optionally check Make Permanent for persistent share.
3. Mount the Shared Folder in the Linux Guest
If Auto-mount was enabled, VirtualBox will mount the shared folder automatically, typically at /media/sf_ (e.g., /media/sf_share) and with group access for vboxsf.
If you want to mount it manually or to a custom location:
- Create a mount point:
mkdir ~/host_share
- Mount using:
sudo mount -t vboxsf ~/host_share
Mount Shared Folder automatically on boot
On a Linux guest, the recommended approach is to add an entry for the shared folder in the guest’s /etc/fstab.
This ensures the folder is mounted each time the system boots.
Open /etc/fstab with a text editor as root:
sudo nano /etc/fstab
Add a line like this, replacing sharename and /home/youruser/host_share with your desired path (e.g., /mnt/shared):
sharename /home/youruser/host_share vboxsf defaults 0 0
The sharename is as defined in VirtualBox Shared Folders settings.
Create the mount point (if it doesn’t exist):
mkdir -p /home/youruser/host_share
Mount all filesystems or reboot to test:
sudo mount -a
Check that your shared folder is now accessible.
Access, Permissions & Troubleshooting
- The shared folder will be owned by
root:vboxsfinside the guest. - Make sure your guest user is in the
vboxsfgroup (id $USERto check). - If you experience permission issues, make sure you are in the
vboxsfgroup and that you log out/in (or reboot) after adding yourself to the group. - For more complex needs or for dynamic/conditional mounting, you can also utilize a systemd automount unit, but
/etc/fstabis the most straightforward and robust for VirtualBox shared folders on Linux.
This approach will ensure your VirtualBox shared folder mounts automatically at every system startup.
VirtualBox can’t operate in VMX root mode.
If you get the following error which blames KVM kernel module
VBoxManage: error:
VirtualBox can't operate in VMX root mode.
Please disable the KVM kernel extension, recompile your kernel and reboot
(VERR_VMX_IN_VMX_ROOT_MODE)

VBoxManage: error:
Details:
code NS_ERROR_FAILURE (0x80004005),
component ConsoleWrap, interface IConsole
Do the following at your own risk. You can try to overcome this error on Ubuntu 24.04 by disabling it temporarily, just make sure noone is using kvm at the moment:
lsmod | grep kvm
lsof | grep kvm
sudo modprobe -r kvm_intel
You can try to disable and recompile if you wish too, and if you use VirtualBox a lot
Check if kvm is loaded (should be the case when getting the VirtualBox error):
lsmod | grep kvm
To check if kvm is currently in use:
lsof | grep kvm
If there is no output, kvm is not being used and the kernel module can be safely unloaded:
sudo rmmod kvm_intel # or kvm_amd on AMD CPUs
sudo rmmod kvm
This will only unload the kernel modul for the current session. To disable kvm on boot you need to blacklist it and update the initramfs. Add this to /etc/modprobe.d/blacklist-kvm.conf:
blacklist kvm
blacklist kvm_intel   # or kvm_amd
Update initramfs and reboot:
sudo update-initramfs -u
sudo reboot
Useful links
- https://www.virtualbox.org/
- Download and instal Virtual box for your Linux version: https://www.virtualbox.org/wiki/Linux_Downloads
- How to Install Ubuntu 24.04 & useful tools
- Bash Cheat Sheet
- Reinstall linux Mint with useful tools)
- Check Linux Ubuntu Version
- Hosting any Executable as a Service in Linux
- Install Portainer on Linux
- Install DBeaver on linux

