
Gitea Actions を使用して Hugo サイトを AWS S3 にデプロイする
AWS S3 上で Gitea と Hugo を設定した後...
次のステップは、CI/CDを実装し、Gitea Actions for Hugo website, to push website to AWS S3を設定することです。masterブランチが更新されたときに自動的にウェブサイトをAWS S3にプッシュします。
すでにインストール、設定、テストを済ませたGitea Gitea Server Setup、およびsetting up Gitea SSLを経て、Hugo website deployment to AWS S3を設定しています。

OK。では始めましょう。
Gitea runner用の新しいトークンを生成する
https://your-gitea-server/your-user/your-repo/settings/actions/runnersにアクセスし、Create New Runnerをクリックしてください。
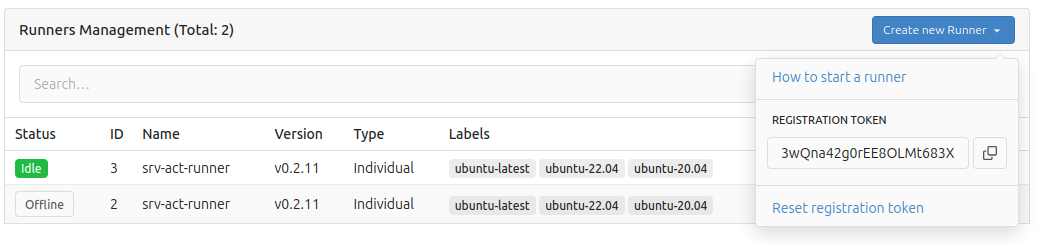
登録トークンをコピーしてください。
新しいGitea Runnerを起動する
新しいGitea runnerが実行されるサーバーにSSH接続し、Dockerコンテナを起動してください。別途の実行ファイルとして起動する、サービスとして実行するなど、方法はいくつかありますが、ここではDockerコンテナを使用します。
sudo docker run \
    -v /var/run/docker.sock:/var/run/docker.sock \
    -e GITEA_INSTANCE_URL=http://<my-gitea-server>:3000/ \
    -e GITEA_RUNNER_REGISTRATION_TOKEN=<my-registration-token> \
    -e GITEA_RUNNER_NAME=srv-act-runner \
    --name my_runner \
    --restart always \
    -d docker.io/gitea/act_runner:latest
ランナーが正常に登録されているか確認する
https://your-gitea-server/your-user/your-repo/settings/actions/runnersにアクセスし、すでに実行されていることを確認してください。
AWSのシークレットをいくつか作成する
https://your-gitea-server/your-user/your-repo/settings/actions/secretsにアクセスし、AWS_ACCESS_KEY_IDとAWS_SECRET_ACCESS_KEYという巨大なシークレットを作成してください。意味はご存じですよね?

Giteaワークフローを作成してHugoをS3に構築・デプロイする
あなたのHugoプロジェクトの.gitea/workflowsフォルダにhugo-deploy.yamlというファイルを作成してください。
name: Gitea Actions - Hugo Deploy
run-name: ${{ gitea.actor }} is testing out Gitea Actions 🚀
on:
  push:
    branches:
      - master
jobs:
  Hugo-Deploy:
    runs-on: ubuntu-latest
    steps:
      - run: echo "🎉 The job was automatically triggered by a ${{ gitea.event_name }} event."
      - run: echo "🐧 This job is now running on a ${{ runner.os }} server hosted by Gitea!"
      - run: echo "🔎 The name of your branch is ${{ gitea.ref }} and your repository is ${{ gitea.repository }}."

      - name: Check out repository code
        uses: actions/checkout@v4
        with:
          submodules: true  # Fetch Hugo themes (true OR recursive)
          fetch-depth: 0    # Fetch all history for .GitInfo and .Lastmod

      - run: echo "💡 The ${{ gitea.repository }} repository has been cloned to the runner."

      - name: Setup Hugo
        uses: peaceiris/actions-hugo@v3
        with:
          hugo-version: '0.134.1' # or remove this for the latest
          extended: true

      - name: List files in the repository
        run: |
          ls

      - name: Build
        run: hugo

      - name: Deploy
        run: hugo deploy
        env:
          AWS_REGION: 'ap-southeast-2'
          AWS_ACCESS_KEY_ID: ${{ secrets.AWS_ACCESS_KEY_ID }}
          AWS_SECRET_ACCESS_KEY: ${{ secrets.AWS_SECRET_ACCESS_KEY }}

      - run: echo "🍏 This job's status is ${{ job.status }}."
もしも、サイトをシドニーでホストする気がない場合は、AWS_REGIONを好きな場所に変更してください。
この設定:
on:
  push:
    branches:
      - master
は、masterブランチへのすべてのプッシュとマージを処理します。
コミットしてプッシュする
サーバーに変更をプッシュした後、https://your-gitea-server/your-user/your-repo/actionsページで、以下のようなものを見ることができるはずです。

良い一日をお過ごしください!
有用なリンク
- Deploy Hugo-generated website to AWS S3
- Submit Google Form in Hugo Website
- Hugo Cheat Sheet
- Most popular themes for Hugo
- Mainroad theme image handling
- Markdown Cheatsheet
- Gitea Server Setup
- Setting up Gitea SSL
- Reinstall linux
- Bash Cheat Sheet
- Hugo Space
- How to store thumbnail images in page bundle folder for Hugo sites with Mainroad theme
