Label Studio と MMDetection を使用したオブジェクト検出 AI のトレーニング
ラベリングとトレーニングには、ある程度の接着が必要です。
以前に オブジェクト検出AIのトレーニング を行った際、LabelImgは非常に役立つツールでしたが、 Label StudioからCOCOフォーマットへのエクスポートは MMDetectionフレームワークで受け入れられていませんでした。
いくつかのツールやスクリプトが必要でした。

ここでは、欠けている部分やスクリプトを列挙しています。 一部はインターネットで見つけたもの、一部は自分で書いたものです。
基本的な手順
AIの準備、トレーニング、使用には以下のステップがあります。
- ソースデータの取得(オブジェクト検出および分類用の画像)
- 画像のラベリングとデータセットの準備
- 新しいモデルの開発または適切な既存モデルの見つける
- モデルのトレーニング、場合によってはハイパーパラメータの調整
- 新しい画像に対してラベルを予測する(推論)
ここでは、Label Studioを使用してデータをラベル付けする方法(ステップ2)と、 mmdetectionおよびtorchvisionを使用してトレーニングする方法(ステップ4)、 そして推論(ステップ5)について、具体的な手順を説明します。
Label Studio
LabelImgというオープンソースのルートを持っていますが、 現在では非常に中央集約的な方法で開発およびメンテナンスされています。 もちろん、エンタープライズ版もあります。
それでも、セルフホスティングが可能で、これは非常に便利です。
設定と実行
Label Studioをいくつかの方法でインストールおよび実行できます。 例えば、pipパッケージや、docker composeコンテナグループなどです。 ここでは、単一のdockerコンテナを使用しています。
ソースフォルダの準備
mkdir ~/ls-data
sudo chown -R 1001:1001 ~/ls-data10
ローカルストレージ設定
mkdir ~/ai-local-store
mkdir ~/ai-local-labels

# いくつかの追加の権限を設定
/ai-local-storeには画像ファイルを保管し、/ai-local-labelsには同期されたラベルを保管します。
コンテナの起動
docker run -it -p 8080:8080 \
    -e LABEL_STUDIO_HOST=http://your_ip_address:8080/ \
    -e LABEL_STUDIO_LOCAL_FILES_SERVING_ENABLED=true \
    -e LABEL_STUDIO_LOCAL_FILES_DOCUMENT_ROOT=/ai-local-store \
    -e DATA_UPLOAD_MAX_NUMBER_FILES=10000000 \
    -v /home/somename/ls-data:/label-studio/data \
    -v /home/somename/ai-local-store:/ai-local-store \
    -v /home/somename/ai-local-labels:/ai-local-labels \
    heartexlabs/label-studio:latest \
    label-studio \
    --log-level DEBUG
LABEL_STUDIO_HOST - LSウェブUIのリダイレクトのためです。 DATA_UPLOAD_MAX_NUMBER_FILES … Djangoではアップロードファイル数が100に制限されており、 ラベルスタジオに深刻な影響を与えるため、この新しい制限を提供する必要があります。 他の設定はすべてLabel Studioドキュメントに非常に詳細に記載されています。
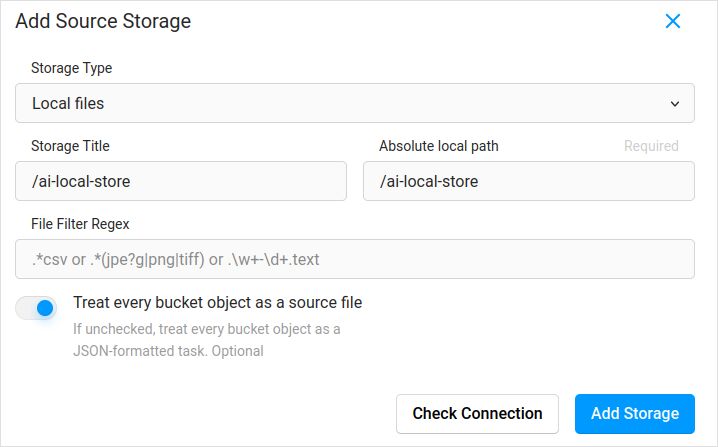
設定ファイルのインポート。プロジェクト設定のクラウドストレージに、ローカルファイルタイプのソースストレージを追加する例は以下の通りです:

画像を同期する予定(おそらくはい)であれば、「各バケットオブジェクトをソースファイルとして扱う」にチェックを入れ忘れないでください。 すでにこれらの画像に対して別のjsonにラベルがある場合は、このクラウドストレージを設定するだけで済みます。 同期しないことを忘れないでください。 その後、jsonファイルをインポートします。
ターゲットクラウドストレージとai-local-labelsを同期するように設定する場合も同様に設定してください。
Label Studioに事前にラベル付けされたデータをインポート
COCO jsonフォーマットやPascal VOCを愛しています。 しかし、それらはLabel Studioと直接互換性がないため、LS専用フォーマットに変換する必要があります。
しかし、それ以前に、データセットのフィルタリングが必要かもしれません。 すべてのラベルではなく、一部のラベルだけが必要な場合があります。 私はcoco-managerのfilter.pyスクリプトが好きです:https://github.com/immersive-limit/coco-manager/blob/master/filter.py
python filter.py --input_json instances_train2017.json --output_json filtered.json --categories person dog cat
では、変換器をインストールします。公式サイトが推奨するように:
python -m venv env
source env/bin/activate
git clone https://github.com/heartexlabs/label-studio-converter.git
cd label-studio-converter
pip install -e .
COCOから変換し、正しいフォルダを設定
label-studio-converter import coco -i your-input-file.json -o output.json
Label Studioでインポートボタンをクリックしてoutput.jsonをインポートします。
ラベリング
ここでは非常に創造的な作業が行われます。
エクスポート
Label Studioでエクスポートボタンをクリックし、COCOエクスポートフォーマットを選択した後、このファイルの中身を見てください。 画像の名前がこのように見える場合、事前にラベルをインポートした際、画像のベースパスを上書きしていない場合です。
  "images": [
    {
      "width": 800,
      "height": 600,
      "id": 0,
      "file_name": "\/data\/local-files\/?d=\/iteration1001\/123.jpg"
    },
または、外部クラウドストレージを同期した場合、このように見える場合です。
  "images": [
    {
      "width": 800,
      "height": 600,
      "id": 0,
      "file_name": "http:\/\/localhost:8080\/data\/local-files\/?d=iteration1001\/123.jpg"
    },
これらはあまり良くありません。以下のようにしたいです。
  "images": [
    {
      "width": 800,
      "height": 600,
      "id": 0,
      "file_name": "iteration1001/123.jpg"
    },
ファイル名を修正するために、私はとても素晴らしいスクリプトを使用しました。 これらはresult.jsonファイルを上書きするため、バックアップが必要な場合は、自分で注意してください:
sed -i -e 's/\\\/data\\\/local-files\\\/?d=\\\///g' ~/tmp/result.json
sed -i "s%http:\\\/\\\/localhost:8080\\\/data\\\/local-files\\\/?d=%%" ~/tmp/result.json
sed -i "s%http:\\\/\\\/your_ip_address:8080\\\/data\\\/local-files\\\/?d=%%" ~/tmp/result.json
Label Studioのデータとデータベースのバックアップ
Label Studioのdockerコンテナを慎重に停止した後、 以下のコマンドを実行します。
cp ~/ls-data ~/all-my-backups
cp ~/ai-local-store ~/all-my-backups
cp ~/ai-local-labels ~/all-my-backups
マージ
いくつかのイテレーションを実行している場合、 複数のデータセットを1つにマージする必要があることがあります。
私はCOCO-mergerツールを使用しました。-hパラメータでインストールして実行した後:
python tools/COCO_merger/merge.py -h

COCO Files Merge Usage

python -m COCO_merger.merge --src Json1.json Json2.json --out OUTPUT_JSON.json

Argument parser

usage: merge.py [-h] --src SRC SRC --out OUT

Merge two annotation files to one file

optional arguments:
  -h, --help     show this help message and exit
  --src SRC SRC  Path of two annotation files to merge
  --out OUT      Path of the output annotation file
はい、2つのファイルのみをマージできます。10回のイテレーションがある場合、追加の努力が必要です。それでも好きです。
MMDetection

データセットの分割
トレーニングとテストにデータセットを分割するために、COCOSplitツールを使用しました。
git clone https://github.com/akarazniewicz/cocosplit.git
cd cocosplit
pip install -r requirements
それほど複雑ではありません:
$ python cocosplit.py -h
usage: cocosplit.py [-h] -s SPLIT [--having-annotations]
                    coco_annotations train test

Splits COCO annotations file into training and test sets.

positional arguments:
  coco_annotations      Path to COCO annotations file.
  train                 Where to store COCO training annotations
  test                  Where to store COCO test annotations

optional arguments:
  -h, --help            show this help message and exit
  -s SPLIT              A percentage of a split; a number in (0, 1)
  --having-annotations  Ignore all images without annotations. Keep only these
                        with at least one annotation
  --multi-class         Split a multi-class dataset while preserving class
                        distributions in train and test sets
COCO分割を実行するには:
python cocosplit.py --having-annotations \
  --multi-class \
  -s 0.8 \
  source_coco_annotations.json \
  train.json \
  test.json
データセットjsonの冒頭にlicensesプロパティを追加することを忘れないでください。 この分割ツールはそれを本当に望んでいます。
"licenses": [],
設定
はい、モデルの設定は複雑です。
しかし、mask-rcnnは非常に高速で、検出率も適切です。 設定の詳細についてはここを参照してください:https://mmdetection.readthedocs.io/en/latest/user_guides/train.html#train-with-customized-datasets
# 新しい設定はベース設定を継承して必要な変更を強調します
_base_ = '/home/someusername/mmdetection/configs/mask_rcnn/mask-rcnn_r50-caffe_fpn_ms-poly-1x_coco.py'

# データセットのアノテーションに合わせてヘッドのnum_classesを変更する必要があります
model = dict(
    roi_head=dict(
        bbox_head=dict(num_classes=3),
        mask_head=dict(num_classes=3)))

# データセット関連の設定を変更
data_root = '/home/someusername/'
metainfo = {
    'classes': ('MyClass1', 'AnotherClass2', 'AndTheLastOne3'),
    'palette': [
        (220, 20, 60),
        (20, 60, 220),
        (60, 220, 20),
    ]
}
train_dataloader = dict(
    batch_size=1,
    dataset=dict(
        data_root=data_root,
        metainfo=metainfo,
        ann_file='train.json',
        data_prefix=dict(img='')))
val_dataloader = dict(
    dataset=dict(
        data_root=data_root,
        metainfo=metainfo,
        ann_file='test.json',
        data_prefix=dict(img='')))
test_dataloader = val_dataloader

# 評価関連の設定を変更
val_evaluator = dict(ann_file=data_root+'test.json')
test_evaluator = val_evaluator

# マスクRCNNの事前トレーニングモデルを使用して、より高いパフォーマンスを得ることができます
load_from = 'https://download.openmmlab.com/mmdetection/v2.0/mask_rcnn/mask_rcnn_r50_caffe_fpn_mstrain-poly_3x_coco/mask_rcnn_r50_caffe_fpn_mstrain-poly_3x_coco_bbox_mAP-0.408__segm_mAP-0.37_20200504_163245-42aa3d00.pth'

# 長い映画が好きなら
# ここではデフォルトが12です
train_cfg = dict(max_epochs=24)
マスクが不要な場合はここを参照してください:https://mmdetection.readthedocs.io/en/latest/user_guides/single_stage_as_rpn.html
トレーニング
あなたのモデル設定が /home/someusername/myproject/models/configs/mask-rcnn_r50-caffe_fpn_ms-poly-1x_v1.0.py にあると仮定します。 トレーニングスクリプトはmmdetectionツールへの標準的な呼び出しだけです:
cd ~/mmdetection
python tools/train.py \
    /home/someusername/myproject/models/configs/mask-rcnn_r50-caffe_fpn_ms-poly-1x_v1.0.py \
    --work-dir /home/someusername/myproject/work-dirs/my-object-detector-v1.0-mask-rcnn_r50-caffe_fpn_ms-poly-1x
推論
いくつかのドキュメントはこちら:https://mmdetection.readthedocs.io/en/latest/user_guides/inference.html
from mmdet.apis import DetInferencer

inferencer = DetInferencer(
    model='/home/someusername/myproject/models/configs/mask-rcnn_r50-caffe_fpn_ms-poly-1x_v1.0.py',
    weights='/home/someusername/myproject/work-dirs/my-object-detector-v1.0-mask-rcnn_r50-caffe_fpn_ms-poly-1x/epoch_12.pth')

# 単一ファイルに対して実行:
# inferencer('demo/demo.jpg', out_dir='/home/someusername/myproject/test-output/1.0/', show=True)

# または、フォルダ全体に対して
inferencer('/home/someusername/myproject/test-images/', out_dir='/home/someusername/myproject/test-output/1.0/', no_save_pred=False)
有用なリンク
何かの助けになることを願っています。
他の有用な情報については以下をご覧ください。

