使用 Label Studio 与 MMDetection 训练目标检测 AI
标签和训练需要一些粘合剂
当我 训练目标检测AI 一段时间之前 - LabelImg 是一个非常有用的工具, 但从 Label Studio 导出到 COCO 格式 不被 MMDetection 框架接受…
它需要一些工具和脚本来使所有内容正常工作。

在这里列出缺失的部分和一些脚本, 其中一些我在互联网上找到,其他是我自己写的。
基本步骤
准备、训练和使用AI涉及以下步骤:
- 获取源数据(用于目标检测和分类的图像)
- 标注图像并准备数据集
- 开发新模型或寻找合适的现有模型
- 训练模型,有时需要进行超参数调优
- 使用模型对新图像进行预测(推理)
在这里,我将给出如何使用 Label Studio 标注数据(步骤2), 以及如何使用 mmdetection 和 torchvision 进行训练(步骤4), 并简要介绍推理(步骤5)。
Label Studio
它有一些开源的 LabelImg 程序的根源, 但现在以一种非常集中的方式开发和维护。 当然,它也有企业版。
尽管如此,它仍然可以用于自托管,这非常不错。
配置和运行
可以通过多种方式安装和运行 Label Studio, 例如 pip 包, 或者 docker compose 容器组。 在这里,我使用单个 docker 容器。
准备源文件夹
mkdir ~/ls-data
sudo chown -R 1001:1001 ~/ls-data10
本地存储配置
mkdir ~/ai-local-store
mkdir ~/ai-local-labels

# 设置一些额外权限
在 /ai-local-store 中保存图像文件,/ai-local-labels - 同步的标签。
启动 docker 容器
docker run -it -p 8080:8080 \
    -e LABEL_STUDIO_HOST=http://your_ip_address:8080/ \
    -e LABEL_STUDIO_LOCAL_FILES_SERVING_ENABLED=true \
    -e LABEL_STUDIO_LOCAL_FILES_DOCUMENT_ROOT=/ai-local-store \
    -e DATA_UPLOAD_MAX_NUMBER_FILES=10000000 \
    -v /home/somename/ls-data:/label-studio/data \
    -v /home/somename/ai-local-store:/ai-local-store \
    -v /home/somename/ai-local-labels:/ai-local-labels \
    heartexlabs/label-studio:latest \
    label-studio \
    --log-level DEBUG
LABEL_STUDIO_HOST - 因为 LS webui 重定向。 DATA_UPLOAD_MAX_NUMBER_FILES … Django 上传文件数限制为 100,这对 Label Studio 影响非常糟糕,所以需要提供这个新限制。 所有其他配置在 Label Studio 文档 中都有详细说明。
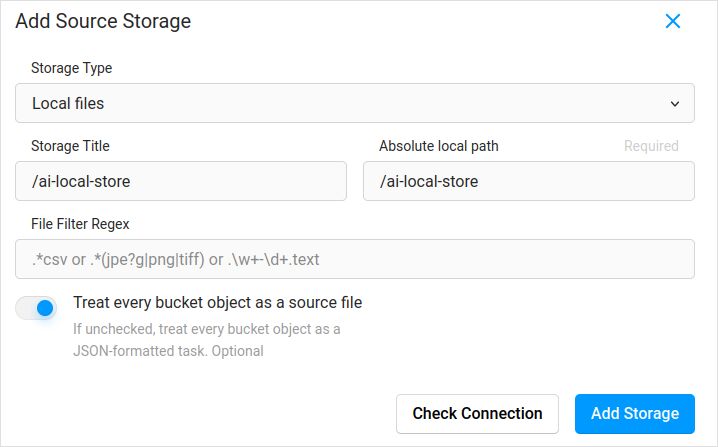
导入配置。在项目设置中的云存储中添加本地文件类型的源存储,类似于:

如果你计划同步图像(我相信是的),请不要忘记勾选“将每个存储桶对象视为源文件”,而不是 json。 如果你已经为这些图像在单独的 json 中有一些标签,只需配置这个云存储。 不要点击 同步。 然后导入 json。
为目标云存储和 ai-local-labels 配置相同的内容 - 如果你想要同步它们。
将预标注数据导入 Label Studio
我喜欢 COCO json 格式。还有 Pascal VOC。 但它们与 Label Studio 不直接兼容,因此需要先转换为 LS 专有格式。
但在此之前,可能需要过滤数据集。你可能只需要其中的一些标签,而不是全部。 我喜欢来自 coco-manager 的 filter.py 脚本:https://github.com/immersive-limit/coco-manager/blob/master/filter.py
python filter.py --input_json instances_train2017.json --output_json filtered.json --categories person dog cat
好的,现在安装转换器。像官方站点推荐的那样:
python -m venv env
source env/bin/activate
git clone https://github.com/heartexlabs/label-studio-converter.git
cd label-studio-converter
pip install -e .
从 coco 转换并设置正确文件夹
label-studio-converter import coco -i your-input-file.json -o output.json
通过点击 Label Studio 的导入按钮导入 output.json。
标注
在这里进行了大量极具创意的工作。
导出
在 Label Studio 中点击导出按钮并选择 COCO 导出格式后,查看这个文件中的图像名称。 如果你在导入标签之前没有覆盖图像基础路径,它们看起来会像这样:
  "images": [
    {
      "width": 800,
      "height": 600,
      "id": 0,
      "file_name": "\/data\/local-files\/?d=\/iteration1001\/123.jpg"
    },
或者如果你同步了外部云存储,它们看起来会像这样:
  "images": [
    {
      "width": 800,
      "height": 600,
      "id": 0,
      "file_name": "http:\/\/localhost:8080\/data\/local-files\/?d=iteration1001\/123.jpg"
    },
这些并不是非常理想。我们想要的是这样的:
  "images": [
    {
      "width": 800,
      "height": 600,
      "id": 0,
      "file_name": "iteration1001/123.jpg"
    },
为了解决文件名问题,我使用了漂亮的脚本。 它们会覆盖 result.json 文件, 所以如果你需要事先备份 - 请自行处理:
sed -i -e 's/\\\/data\\\/local-files\\\/?d=\\\///g' ~/tmp/result.json
sed -i "s%http:\\\/\\\/localhost:8080\\\/data\\\/local-files\\\/?d=%%" ~/tmp/result.json
sed -i "s%http:\\\/\\\/your_ip_address:8080\\\/data\\\/local-files\\\/?d=%%" ~/tmp/result.json
备份 Label Studio 数据和数据库
小心地停止你的 Label Studio docker 容器, 然后运行类似以下命令:
cp ~/ls-data ~/all-my-backups
cp ~/ai-local-store ~/all-my-backups
cp ~/ai-local-labels ~/all-my-backups
合并
有时需要将多个数据集合并为一个,特别是如果你运行了多个迭代。
我使用了 COCO-merger 工具。安装并使用 -h 参数运行后:
python tools/COCO_merger/merge.py -h

COCO Files Merge Usage

python -m COCO_merger.merge --src Json1.json Json2.json --out OUTPUT_JSON.json

Argument parser

usage: merge.py [-h] --src SRC SRC --out OUT

Merge two annotation files to one file

optional arguments:
  -h, --help     show this help message and exit
  --src SRC SRC  Path of two annotation files to merge
  --out OUT      Path of the output annotation file
是的,只能合并两个文件。所以如果你有10次迭代,需要额外努力。但我还是喜欢它。
MMDetection

分割数据集
为了将数据集分割为训练和测试,我使用了 COCOSplit 工具。
git clone https://github.com/akarazniewicz/cocosplit.git
cd cocosplit
pip install -r requirements
它并不太复杂:
$ python cocosplit.py -h
usage: cocosplit.py [-h] -s SPLIT [--having-annotations]
                    coco_annotations train test

将 COCO 注解文件分割为训练和测试集。

位置参数:
  coco_annotations      COCO 注解文件的路径。
  train                 存储 COCO 训练注解的位置
  test                  存储 COCO 测试注解的位置

可选参数:
  -h, --help            显示帮助信息并退出
  -s SPLIT              分割比例;一个在 (0, 1) 之间的数字
  --having-annotations  忽略所有没有注解的图像。只保留至少有一个注解的这些图像
  --multi-class         在保留训练和测试集中的类别分布的同时,分割多类别数据集
运行 coco 分割:
python cocosplit.py --having-annotations \
  --multi-class \
  -s 0.8 \
  source_coco_annotations.json \
  train.json \
  test.json
请记住在数据集 json 的开头添加 licenses 属性,位于第一个 “{” 之后。 这个分割工具真的需要它。
"licenses": [],
配置
是的,模型配置是 复杂的。
但 mask-rcnn 相当快,检测率也相当合理。 有关配置详细信息,请参见此处:https://mmdetection.readthedocs.io/en/latest/user_guides/train.html#train-with-customized-datasets
# 新配置继承一个基础配置以突出必要的修改
_base_ = '/home/someusername/mmdetection/configs/mask_rcnn/mask-rcnn_r50-caffe_fpn_ms-poly-1x_coco.py'

# 我们还需要更改头部的 num_classes 以匹配数据集的注解
model = dict(
    roi_head=dict(
        bbox_head=dict(num_classes=3),
        mask_head=dict(num_classes=3)))

# 修改与数据集相关的设置
data_root = '/home/someusername/'
metainfo = {
    'classes': ('MyClass1', 'AnotherClass2', 'AndTheLastOne3'),
    'palette': [
        (220, 20, 60),
        (20, 60, 220),
        (60, 220, 20),
    ]
}
train_dataloader = dict(
    batch_size=1,
    dataset=dict(
        data_root=data_root,
        metainfo=metainfo,
        ann_file='train.json',
        data_prefix=dict(img='')))
val_dataloader = dict(
    dataset=dict(
        data_root=data_root,
        metainfo=metainfo,
        ann_file='test.json',
        data_prefix=dict(img='')))
test_dataloader = val_dataloader

# 修改与指标相关的设置
val_evaluator = dict(ann_file=data_root+'test.json')
test_evaluator = val_evaluator

# 我们可以使用预训练的 Mask RCNN 模型以获得更高的性能
load_from = 'https://download.openmmlab.com/mmdetection/v2.0/mask_rcnn/mask_rcnn_r50_caffe_fpn_mstrain-poly_3x_coco/mask_rcnn_r50_caffe_fpn_mstrain-poly_3x_coco_bbox_mAP-0.408__segm_mAP-0.37_20200504_163245-42aa3d00.pth'

# 如果你喜欢长电影
# 默认值在这里如果我记得正确是 12
train_cfg = dict(max_epochs=24)
如果不需要掩码,可以参考这里:https://mmdetection.readthedocs.io/en/latest/user_guides/single_stage_as_rpn.html
训练
假设你的模型配置在 /home/someusername/myproject/models/configs/mask-rcnn_r50-caffe_fpn_ms-poly-1x_v1.0.py 中。 训练脚本是标准调用 mmdetection 工具:
cd ~/mmdetection
python tools/train.py \
    /home/someusername/myproject/models/configs/mask-rcnn_r50-caffe_fpn_ms-poly-1x_v1.0.py \
    --work-dir /home/someusername/myproject/work-dirs/my-object-detector-v1.0-mask-rcnn_r50-caffe_fpn_ms-poly-1x
推理
一些文档在这里:https://mmdetection.readthedocs.io/en/latest/user_guides/inference.html
from mmdet.apis import DetInferencer

inferencer = DetInferencer(
    model='/home/someusername/myproject/models/configs/mask-rcnn_r50-caffe_fpn_ms-poly-1x_v1.0.py',
    weights='/home/someusername/myproject/work-dirs/my-object-detector-v1.0-mask-rcnn_r50-caffe_fpn_ms-poly-1x/epoch_12.pth')

# 为单个文件运行:
# inferencer('demo/demo.jpg', out_dir='/home/someusername/myproject/test-output/1.0/', show=True)

# 或者为整个文件夹
inferencer('/home/someusername/myproject/test-images/', out_dir='/home/someusername/myproject/test-output/1.0/', no_save_pred=False)
有用的链接
希望这能以某种方式帮助你。
其他有用的阅读请参见:
- Label Studio 网站:https://labelstud.io/
- MMDetection 文档:https://mmdetection.readthedocs.io/en/latest/get_started.html
- Bash 命令速查表
- 使用 tensorflow 检测混凝土钢筋帽
- Python 命令速查表
- Conda 命令速查表
- Flux 文本到图像
- Ollama 命令速查表
- Docker 命令速查表
- 使用 AWS SAM 和 Python 实现分层 Lambda
- 在 Python 中生成 PDF - 库和示例"

