使用 Apache 作为反向代理的 Gitea SSL 配置
在 k8s 中使用容器镜像仓库需要通过 SSL
我们想要托管一个安全且功能良好的容器镜像仓库,以便将 Docker 镜像推送到那里,并让我们的 Kubernetes 集群从该仓库中拉取镜像。因此,我们想到了使用通过 SSL 的 Gitea。
- Gitea 已经具备容器镜像仓库功能
- 使用 Apache 作为 TLS 终止代理,为我们的 Gitea 添加 HTTPS
- 就这样开始了……生成根 CA,自签名证书……

在 Kubernetes 中使用仓库时
不幸的是,由 kubespray 创建的 Kubernetes 集群中的仓库对我而言无法正常工作。
- 要推送到它,我们需要通过 kube-proxy 创建临时隧道
- 推送之后,我当前版本的新集群无法从这个内部仓库拉取镜像
在花费了两个令人愉快的晚上尝试修复之后,我决定直接使用 Gitea 的内部容器镜像仓库,只需配置对它的 HTTPS 访问即可。
无论如何,我会将其设为公开,这样 Docker 和 Kubernetes 就不需要进行任何 Docker 登录操作。也许吧。让我们看看进展如何。
测试是否正常工作
为了测试容器镜像仓库是否适合我们,我们需要能够:
- 将镜像推送到那里
- 从该镜像创建 Kubernetes 部署
sudo docker pull alpine:3.12.0
sudo docker images
sudo docker tag a24bb4013296 localhost:5000/rg/alpine:version.3.12.0
sudo docker push localhost:5000/rg/alpine:version.3.12.0
现在,根据你的心情,使用 xed alp1.yaml 或 nano alp1.yaml,并添加以下内容:
apiVersion: apps/v1
kind: Deployment
metadata:
  name: alp-registry-test
spec:
  replicas: 1
  selector:
    matchLabels:
      app: alp-registry-test
  template:
    metadata:
      labels:
        app: alp-registry-test
    spec:
      containers:
        - name: alpine-test
          image: localhost:5000/rg/alpine:version.3.12.0
      imagePullSecrets:
      - name: registry-secret
此文件可下载
然后创建这个部署:
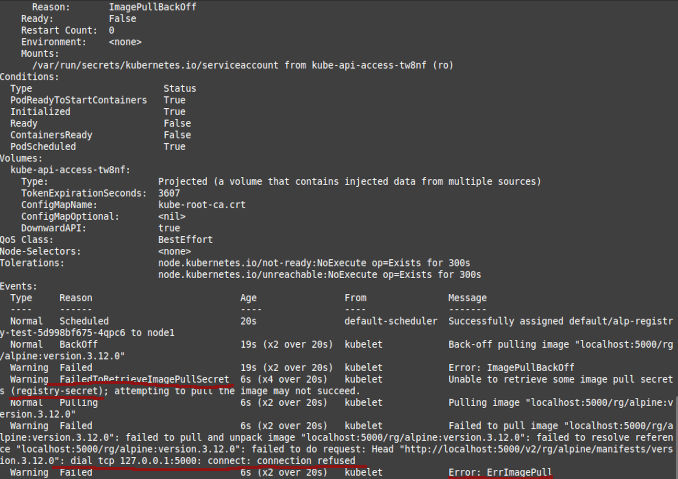
kubectl create -f alp1.yaml
kubectl get pods

kubectl describe po alp-registry-test-5f5cb94b97-njsp2
# 或者无论创建了哪个 pod 或者没有创建
是的,我知道这部分:
      imagePullSecrets:
      - name: registry-secret
registry-secret 是 kubespray 创建的 secret 的名称。
清理:
kubectl delete -f alp1.yaml
实现方式
有关文档,可以在 Gitea 网站: https-setup 上找到
以及该页面:https://docs.gitea.com/administration/reverse-proxies
第一步 - 安装 Apache 并创建简单的测试站点
安装 Apache:
sudo apt install apache2
检查防火墙中的配置:
sudo ufw status
如果防火墙处于活动状态,请考虑要通过 HTTPS 暴露的端口并允许它。标准的 Apache 配置为:
sudo ufw app list
我们可能会看到类似的内容:
Available applications:
  Apache
  Apache Full
  Apache Secure
  OpenSSH
要仅启用端口 443,我们执行:
sudo ufw allow 'Apache Secure'
好的,现在检查服务状态:
sudo systemctl status apache2
接下来,创建一个简单的虚拟服务器以测试 Apache:
sudo mkdir /var/www/reg.homelab
sudo chown -R $USER:$USER /var/www/reg.homelab
sudo chmod -R 755 /var/www/reg.homelab
sudo nano /var/www/reg.homelab/index.html
在其中放入:
<html>
    <head>
        <title>Welcome to reg.homelab!</title>
    </head>
    <body>
        <h1>成功!reg.homelab 虚拟主机正在运行!</h1>
    </body>
</html>
然后:
sudo nano /etc/apache2/sites-available/reg.homelab.conf
放入以下内容:
<VirtualHost *:3080>
    ServerAdmin webmaster@localhost
    ServerName reg.homelab
    ServerAlias www.reg.homelab
    DocumentRoot /var/www/reg.homelab
    ErrorLog ${APACHE_LOG_DIR}/error.log
    CustomLog ${APACHE_LOG_DIR}/access.log combined
</VirtualHost>
然后禁用默认站点,启用这个站点并检查我们的情况:
sudo a2ensite reg.homelab.conf
sudo a2dissite 000-default.conf
sudo apache2ctl configtest
看到类似以下内容吗?
AH00558: apache2: 无法可靠地确定服务器的完全限定域名,使用 127.0.1.1。设置 'ServerName' 指令全局以抑制此消息
然后:
sudo nano /etc/apache2/apache2.conf
在末尾添加:
ServerName reg.homelab
这还不是终点!现在需要删除端口 80 的绑定尝试:
sudo nano /etc/apache2/ports.conf
放入以下内容:
Listen 3030
...
Listen 443
现在:
sudo systemctl restart apache2
sudo systemctl status apache2
journalctl -xeu apache2.service
curl localhost:3080
好! 现在导航到
第二步 - 将此站点转换为 Gitea 的不安全反向代理
sudo nano /etc/apache2/sites-available/reg.homelab.conf
放入以下内容:
<VirtualHost *:443>
    ServerAdmin webmaster@localhost
    ServerName reg.homelab
    ServerAlias www.reg.homelab
    ErrorLog ${APACHE_LOG_DIR}/error.log
    CustomLog ${APACHE_LOG_DIR}/access.log combined
    ProxyPreserveHost On
    ProxyRequests off
    AllowEncodedSlashes NoDecode
    ProxyPass / http://localhost:3000/ nocanon
</VirtualHost>
进行一些配置测试:
sudo apache2ctl configtest
添加一些 Apache 模块并重启 Apache:
sudo a2enmod proxy proxy_http ssl
sudo systemctl restart apache2
sudo systemctl status apache2
好的,现在导航到或使用 curl:
# 是的,它仍然是 HTTP,但使用 443 端口
curl http://localhost:443
http://<Server_IP_Address>:443/
第三步 - 自签名根 CA 和站点证书
SweetHome-RootCA.
CANAME=MostImportant-RootCA

# 可选,创建一个目录
mkdir $CANAME
cd $CANAME

# 生成 AES 加密的私钥
openssl genrsa -aes256 -out $CANAME.key 4096

# 创建证书,1826 天 = 5 年
openssl req -x509 -new -nodes -key $CANAME.key -sha256 -days 1826 -out $CANAME.crt -subj '/CN=My Root CA/C=AT/ST=Vienna/L=Vienna/O=MyOrganisation'

# 创建服务证书
MYCERT=reg.homelab
openssl req -new -nodes -out $MYCERT.csr -newkey rsa:4096 -keyout $MYCERT.key -subj '/CN=My Firewall/C=AT/ST=Vienna/L=Vienna/O=MyOrganisation'

# 创建一个 v3 ext 文件用于 SAN 属性
cat > $MYCERT.v3.ext << EOF
authorityKeyIdentifier=keyid,issuer
basicConstraints=CA:FALSE
keyUsage = digitalSignature, nonRepudiation, keyEncipherment, dataEncipherment
subjectAltName = @alt_names

[alt_names]
DNS.1 = reg.homelablab
DNS.2 = gitea.homelablab
IP.1 = 192.168.0.10
IP.2 = 192.168.0.11
EOF

openssl x509 -req -in $MYCERT.csr -CA $CANAME.crt -CAkey $CANAME.key -CAcreateserial -out $MYCERT.crt -days 730 -sha256 -extfile $MYCERT.v3.ext
在连接到 gitea / 仓库的机器上
在 Linux 上注册根证书:
sudo cp MostImportant-RootCA.crt /usr/local/share/ca-certificates
sudo update-ca-certificates
在 Windows 上注册根证书:
- 双击文件 MostImportant-RootCA.crt
- 导入到本地用户
- 选择受信任的根证书颁发机构
- 当提示关于导入不受信任证书时,点击“是”
当在 Windows 上使用 git pull 时出现以下提示:
无法解析 "unable to get local issuer certificate...
你可以通过以下方式告诉 git 使用 Windows 网络层:
git config --global http.sslbackend schannel
第四步 - 使用自签名证书保护代理
https://httpd.apache.org/docs/2.4/ssl/ssl_howto.html
如果在第 3 步中没有创建自签名证书,请创建一个:
sudo openssl req -x509 -nodes -days 365 -newkey rsa:2048 \
  -subj "/CN=reg.homelab" \
  -addext "subjectAltName = DNS:reg.homelab" \
  -keyout /etc/ssl/private/apache-selfsigned-reg.homelab.key \
  -out /etc/ssl/certs/apache-selfsigned-reg.homelab.crt
或者直接从上一步中获取:
sudo cp reg.homelab.crt /etc/ssl/certs/apache-selfsigned-reg.homelab.crt
sudo cp reg.homelab.key /etc/ssl/private/apache-selfsigned-reg.homelab.key
再次打开虚拟主机配置:
sudo nano /etc/apache2/sites-available/reg.homelab.conf
在底部添加 SSL 部分和证书:
<VirtualHost *:443>
   ServerAdmin webmaster@localhost
   ServerName reg.homelab
   ServerAlias www.reg.homelab
   ErrorLog ${APACHE_LOG_DIR}/error.log
   CustomLog ${APACHE_LOG_DIR}/access.log combined
   ProxyPreserveHost On
   ProxyRequests off
   AllowEncodedSlashes NoDecode
   ProxyPass / http://localhost:3000/ nocanon

   SSLEngine on
   SSLCertificateFile /etc/ssl/certs/apache-selfsigned-reg.homelab.crt
   SSLCertificateKeyFile /etc/ssl/private/apache-selfsigned-reg.homelab.key
</VirtualHost>
检查配置,重启服务器,检查状态并导航到我们的 Gitea(通过 SSL):
sudo apache2ctl configtest
sudo systemctl restart apache2
sudo systemctl status apache2

# 转到:http://<Server_IP_Address>:443/
# 或
curl -k -v https://localhost
浏览器将警告关于自签名证书:
您的连接不安全
攻击者可能试图从 reg.homelab 偷取您的信息(例如,密码、消息或信用卡)。了解更多
NET::ERR_CERT_AUTHORITY_INVALID
但我们暂时忽略它,直到使用 Let’s Encrypt。
现在进行 Kubernetes 测试
进行一些 DNS 设置…
在每个 Kubernetes 节点上:
sudo nano /etc/hosts
并添加以下内容:
192.168.18.200 gitea.homelab
192.168.18.200 reg.homelab
根 CA
在每个 Kubernetes 节点上:
sudo cp SweetHome-RootCA.crt /usr/local/share/ca-certificates
sudo update-ca-certificates
然后重启:
创建带有仓库凭证的 secret
https://kubernetes.io/docs/tasks/configure-pod-container/pull-image-private-registry/
sudo docker login reg.homelab
kubectl create secret generic regcred --from-file=.dockerconfigjson=/home/rg/.docker/config.json --type=kubernetes.io/dockerconfigjson
或者
kubectl create secret docker-registry regcred --docker-server=your-registry-server --docker-username=your-name --docker-password=your-pword --docker-email=your-email
新的 Docker 镜像和 Kubernetes 部署
sudo docker pull alpine:3.12.0
sudo docker images
sudo docker tag a24bb4013296 reg.homelab/rg/alpine:version.3.12.0
sudo docker push reg.homelab/rg/alpine:version.3.12.0
现在使用 nano alp2.yaml,该文件可下载
apiVersion: apps/v1
kind: Deployment
metadata:
  name: alp-registry-test
spec:
  replicas: 1
  selector:
    matchLabels:
      app: alp-registry-test
  template:
    metadata:
      labels:
        app: alp-registry-test
    spec:
      containers:
        - name: alpine-test
          image: reg.homelab/rg/alpine:version.3.12.0
      imagePullSecrets:
      - name: regcred
此文件可下载:
然后创建这个部署:
kubectl create -f alp2.yaml
kubectl get pods
kubectl describe po alp...
清理:
kubectl delete -f alp2.yaml

